No-Bake Chocolate Peanut Butter Cups are the ultimate expression of culinary minimalism. With just four ingredients and zero heat required, they deliver a near-perfect balance of rich, smooth chocolate and sweet, salty peanut butter that rivals any store-bought version. This recipe unlocks the secret to creating these iconic treats at home, allowing you to control the quality of ingredients and customize the ratios to your exact craving. They are a foolproof project that yields impressive, professional-looking results with almost no effort.
The Science of a Perfect Cup
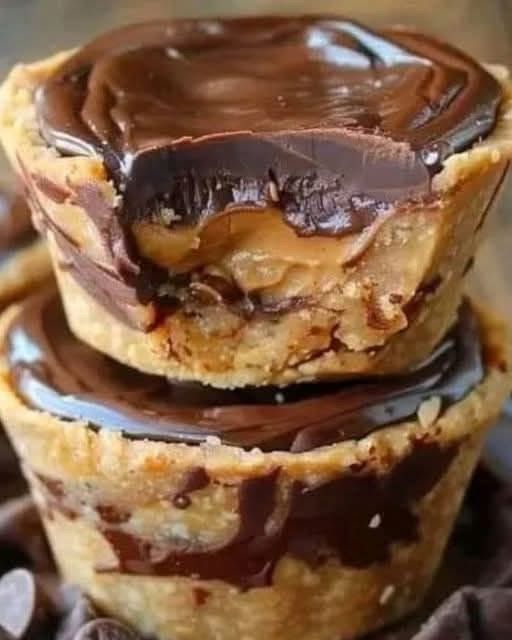
The structural success of this treat relies on the simple melting and setting properties of its core components. The coconut oil (or butter) is the critical ingredient that thins the chocolate, allowing it to be easily poured and creating a smooth, glossy finish with a clean “snap” when set. The powdered sugar in the peanut butter filling is not just for sweetness; its fine texture and cornstarch content absorb the natural oils in the peanut butter, transforming it from a spreadable paste into a moldable, fudge-like consistency that holds its shape beautifully. Layering the chocolate ensures a complete seal around the filling, creating that satisfying moment of breaking through the shell to reach the creamy center.
The Complete Recipe: No-Bake Chocolate Peanut Butter Cups
Prep Time: 20 minutes | Setting Time: 30 minutes | Total Time: 50 minutes | Yield:12 standard cups
Ingredients
For the Chocolate Shells:
-
1 ½ cups (265g) semi-sweet chocolate chips (or chopped chocolate bar)
-
1 tablespoon (15ml) refined coconut oil (or unsalted butter)
For the Peanut Butter Filling:
-
¾ cup (190g) creamy peanut butter (not natural/oily style)
-
¼ cup (30g) powdered sugar (confectioners’ sugar)
-
Pinch of fine sea salt (omit if using salted peanut butter)
Optional Garnish:
-
Flaky sea salt for sprinkling
Step-by-Step Instructions
1. Prepare the Molds:
-
Line a 12-cup standard muffin tin with paper or silicone liners. This is essential for easy removal.
2. Create the Chocolate Base:
-
In a microwave-safe bowl, combine the chocolate chips and coconut oil.
-
Microwave on 50% power in 30-second bursts, stirring vigorously after each interval, until the mixture is completely smooth and fluid. Be careful not to overheat.
-
Using a spoon, pour about 1 teaspoonof melted chocolate into the bottom of each liner. Tilt the tin to spread the chocolate slightly up the sides. Place the tin in the freezer for 10 minutes to set completely.
3. Make the Peanut Butter Filling:
-
While the bases set, in a medium bowl, stir together the peanut butter, powdered sugar, and pinch of salt until smooth and well combined. The mixture will be thick and slightly dry.
-
Once the chocolate bases are firm, remove the tin from the freezer. Divide the peanut butter mixture evenly among the cups (about 1 heaping teaspoon each). Press it down gently into a flat disc, leaving a small border around the edge.
4. Seal with Chocolate and Set:
-
Re-melt the remaining chocolate for a few seconds if it has thickened. Spoon or pour chocolate over each peanut butter disc, covering it completely and sealing the edges.
-
Gently tap the tin on the counter to remove air bubbles. If desired, sprinkle the top of each cup with a few flakes of sea salt.
-
Return the tin to the freezer for 20 minutes, or until the tops are completely firm and set.
5. Serve and Store:
-
Peel off the liners and enjoy. Store leftovers in an airtight container in the refrigerator for up to 2 weeks, or in the freezer for up to 3 months.
Pro Tips for Perfect Cups Every Time
-
Ingredient Quality is Key: Use a standard, stabilized creamy peanut butter (like Jif or Skippy). Natural peanut butter that separates can make the filling oily and difficult to set. For the chocolate, a good-quality chocolate bar chopped up will yield a superior flavor and snap compared to basic chips.
-
The Melting Secret: Gentle, low heat is non-negotiable. Microwaving at full power or overheating will cause the chocolate to “seize” (become grainy and thick). If this happens, stir in an extra ½ teaspoon of coconut oil to rescue it.
-
Smooth Filling: If your peanut butter mixture is too stiff to work with, you can microwave it for 5-10 seconds to soften it slightly. Avoid adding liquid, as it will prevent proper setting.
-
Creative Variations:
-
Dark Chocolate: Use dark chocolate chips for a less sweet, more intense cup.
-
Crunchy: Add 2 tablespoons of crushed graham crackers or rice cereal to the peanut butter filling.
-
Nutty: Press a whole peanut or almond into the top of the filling before adding the final chocolate layer.
-
-
For a Professional Finish: Use specialty mini peanut butter cup moldsavailable online. They create the classic ridged edge and require no liners.
Conclusion: The Quintessential Homemade Candy
These No-Bake Chocolate Peanut Butter Cups are more than just a quick dessert; they are a testament to the power of simple, high-quality ingredients combined with a clever, no-fuss technique. They offer the deep satisfaction of making a beloved candy from scratch, with results that are fresher, more customizable, and often more delicious than anything from a package. This recipe is a keeper—a reliable path to sweet satisfaction that proves the best things in life (or at least in the kitchen) don’t always require an oven