No-Bake Chocolate Oat Bars (Easy, Healthy-ish & Irresistible!)
If you’re looking for a quick, crowd-pleasing dessert that requires zero baking, minimal ingredients, and maximum flavor, these No-Bake Chocolate Oat Bars are exactly what you need.
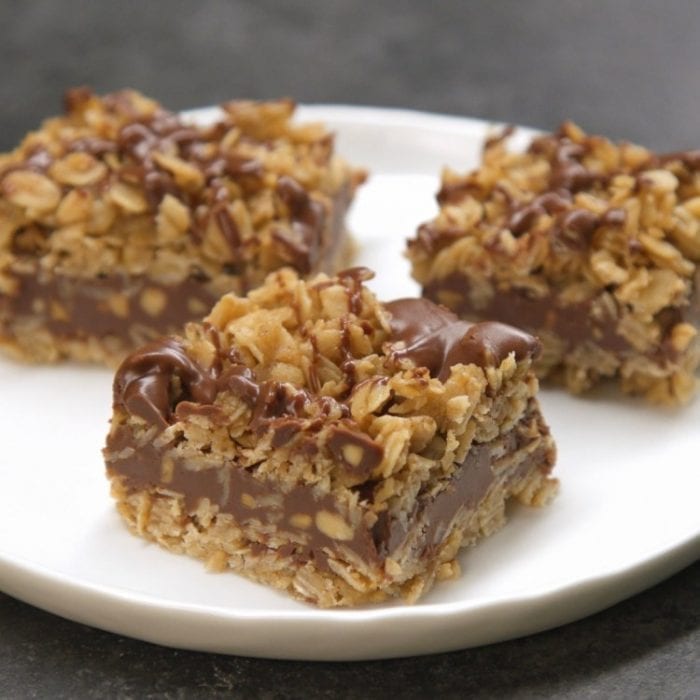
With a rich chocolate-peanut butter layer nestled between chewy, buttery oats, these bars taste like a cross between a granola bar and a fudge brownie — but come together in just minutes. They’re naturally gluten-free (if using certified oats), freezer-friendly, and made from pantry staples. Whether you’re whipping them up for an after-school snack, meal prep, or a guilt-free indulgence, these bars are the definition of effortless decadence.
Ingredients & What Each One Does
For the Oat Layer:
-
1 cup unsalted butter – Adds richness and helps bind the oats into a chewy base.
-
½ cup packed brown sugar – Provides sweetness and a subtle molasses depth.
-
1 teaspoon vanilla extract – Enhances overall flavor.
-
3 cups old-fashioned rolled oats – The hearty, wholesome base that gives texture and chew.
For the Chocolate Layer:
-
1 cup semi-sweet chocolate chips – Melts into a fudgy, glossy filling.
-
½ cup creamy peanut butter – Adds creaminess, structure, and nutty flavor to balance the chocolate.
✅ Optional add-ins: A pinch of salt, a handful of chopped nuts, or a sprinkle of sea salt on top for extra flair.
Step-by-Step Instructions
1. Prepare Your Pan
-
Line an 8×8-inch or 9×9-inch square baking dish with parchment paper, leaving some overhang for easy removal.
2. Make the Oat Mixture
-
In a large saucepan over medium heat, melt the butter.
-
Stir in the brown sugar and vanilla. Mix until dissolved.
-
Add the rolled oats, and cook for 3–4 minutes, stirring constantly to coat.
-
Remove from heat.
3. Press & Chill the Base
-
Press half of the oat mixture evenly into the bottom of the prepared pan.
-
Reserve the other half for the topping.
-
Place the pan in the fridge or freezer to let the bottom layer firm up slightly while you prepare the filling.
4. Make the Chocolate-Peanut Butter Filling
-
In a microwave-safe bowl, combine chocolate chips and peanut butter.
-
Microwave in 30-second intervals, stirring between each, until smooth and fully melted (about 1–2 minutes total).
5. Layer & Finish
-
Pour the chocolate-peanut butter mixture over the chilled oat base.
-
Use a spatula to spread it evenly.
-
Crumble or press the remaining oat mixture on top.
6. Chill to Set
-
Refrigerate for at least 2–3 hours or until firm enough to slice.
-
For faster results, place in the freezer for 1 hour.
7. Slice & Serve
-
Use the parchment overhang to lift the bars out.
-
Slice into 16 squares or 12 larger bars, depending on preference.
Why People Love These No-Bake Chocolate Oat Bars
-
No oven required – Perfect for summer or quick prep days.
-
Wholesome ingredients – Oats, peanut butter, and minimal sugar.
-
Customizable – Add coconut, flaxseed, chia, or your favorite nut butter.
-
Kid-friendly & freezer-safe – Make a big batch and store for weeks.
Pro Tips for Perfect Bars
-
Use rolled oats, not quick oats, for best texture.
-
Want a firmer bar? Use natural peanut butter with less oil separation or chill longer.
-
Line your pan with parchment paper – this makes removal and cleanup a breeze.
-
Sprinkle with flaky sea salt before chilling for a gourmet touch.
Serving & Storage Suggestions
-
Store in an airtight container in the fridge for up to 1 week.
-
Freeze individually wrapped bars for up to 2 months — just thaw for 10 minutes before eating.
-
Serve as a post-workout snack, sweet afternoon pick-me-up, or even dessert for a party.
Pair with:
-
A hot latte or iced coffee
-
A smoothie bowl for breakfast
-
A cold glass of milk or plant-based alternative
Final Thoughts: The Perfect Easy Treat with Big Flavor
These No-Bake Chocolate Oat Bars check every box: they’re fast, easy, indulgent, and made with real ingredients you probably already have. Whether you’re craving something sweet but don’t want to turn on the oven, or you need a reliable, freezer-friendly snack, this recipe will quickly become a staple in your kitchen.
Simple to make. Impossible to resist. Always a hit.